Tuesday, July 28, 2020

Hull Wax and New Sending Unit

Waxed the hull and polished the rubrail, anchor strike plate, and cut water today.  

Out with the old.  


The homemade $8 press made easy work of extracting the well bedded, old sounder's sending unit.

In with the new.  The new sending unit is bedded in an abundant amount of BoatSeal.


The homemade deep-socket allowed the sounder's wire to pass through it as the socket tightened the sounder's 2-3/8" retaining nut--something a traditional socket would not have allowed.


Each of the last four days working on Nellie has gotten a little hotter.  As the car's thermometer shows, it was 108°F on the tarmac at 11 am this morning.


Saturday, July 25, 2020

The Bottom Job


After being lifted out of the water Nellie was power washed then left drying on the hard for three weeks.  Any flaking bottom paint was scraped off and all underwater running gear (that needed it) was repainted with epoxy.  

The bottom was painted with 3-1/2 gallons of West Marine CPP ablative: one coat everywhere; two coats on the running gear; three coats on the bow and;  three coats from the waterline down three feet.  The remaining paint will be used when Nellie's back in the slings to double coat the area under the eight stand pads and three hull blocks.

Note: some of the old bottom paint had come off revealing the barrier coat.  The barrier coat is in excellent condition and no blisters were seen anywhere.  DBH


Sunday, May 10, 2020

Removing Wall Finish


This very sharp paint scraper works well to get Tommy's two part finish out of the wainscot's chamfer.

Monday, April 20, 2020

Serendipitously Finding Engine Mount Natural Neutral


After installing Nellie's new Cushyfloat 45 engine mounts, the vibration data shown by the graph's red line were collected.  The amount of vibration was greater than expected.  I suspected that the aft, starboard mount was a little low.  So, with the engine running, I began the leveling procedure by loosening the mount's nut (shown in picture).


 I was surprised, to say the least, when the vibration instantly stopped. By loosening the nut with the engine running, the engine adjusted itself to find its own natural neutral. At this point I re-tightened the bolt.   The graph's blue line shows the marked improvement.  

Friday, April 17, 2020

Engine Mount Lessons Learned

I've learned a lot putting new engine mounts in Nellie.  One, it's not a hard job.  Two, selecting the proper engine mount is critical.  
Nellie's factory-original Cushyfloat mounts had no model number.

The first new set of mounts, Cushyfloat 65's, were dramatically noiser than Nellie's factory-original Cushyfloat mounts.  I then removed the 65's and installed Cushyfloat 45's.  The graph below compares the wheelhouse noise level with each mount type.


On average the 45's are more than 50% quieter (-12bB) than the 65's. 


Why?  Because as the graph above shows, they're better at dampening the engine's vibration. 

Bottom line, Nellie has never run been quieter or smoother.

Tuesday, April 14, 2020

An Update on Portlight Screens

Nellie's new bronze screen.

Nellie D. 37VT63 wasn't lucky enough to get factory window screens and it was a struggle to come up with a good alternative. Particularly irksome are the little portlights in the shower, head, and stateroom.  An effective, inexpensive and now time tested solution is to use the port's stainless ring to hold a screen in place.

Screen caulked inplace on backside of portlight ring.

The installation process is very straight forward. In fact, the hardest part of the job is removing the stainless ring. It is bedded in polysulfide but will yield with patience. I used a razor knife to cut the joint around the inside of the window. Then working around the inner circumference, with two screwdrivers and a putty knife, I gradually wedged the ring away from the cabin side. Two things to watch-out for: don't scratch the gel coat and don't bend the ring. With the ring off you'll note that the port itself is well bedded. If there are voids in the port's bedding, fix them now as I suggest the ring be reinstalled without bedding—it makes replacing a damaged screen much easier. Use the ring as a template but cut the screen about 1/4" smaller. A thin layer of silicone caulk will secure the screen to the ring. After the caulk is dry reinstall the ring. As always, make sure to bed the screws.

In 2013 I installed $3 worth of 18 x 16 mesh, aluminum screen in the four ports. Last month, after seven years in use, I noticed some galvanic corrosion on the aluminum screen.  The aluminum screen was easily replaced with $18 worth of bronze, 18 x 16 mesh, screen.  Why bronze screen?  Well, it should last longer than aluminum as it's closer in nobility to stainless steel.  But, more importantly, it looks cool!

By the way, worth considering too is the size of the screen's mesh. A 20 x 20 mesh will keep no-see-ums out.

Thursday, December 26, 2019

Muffler Leak Repair

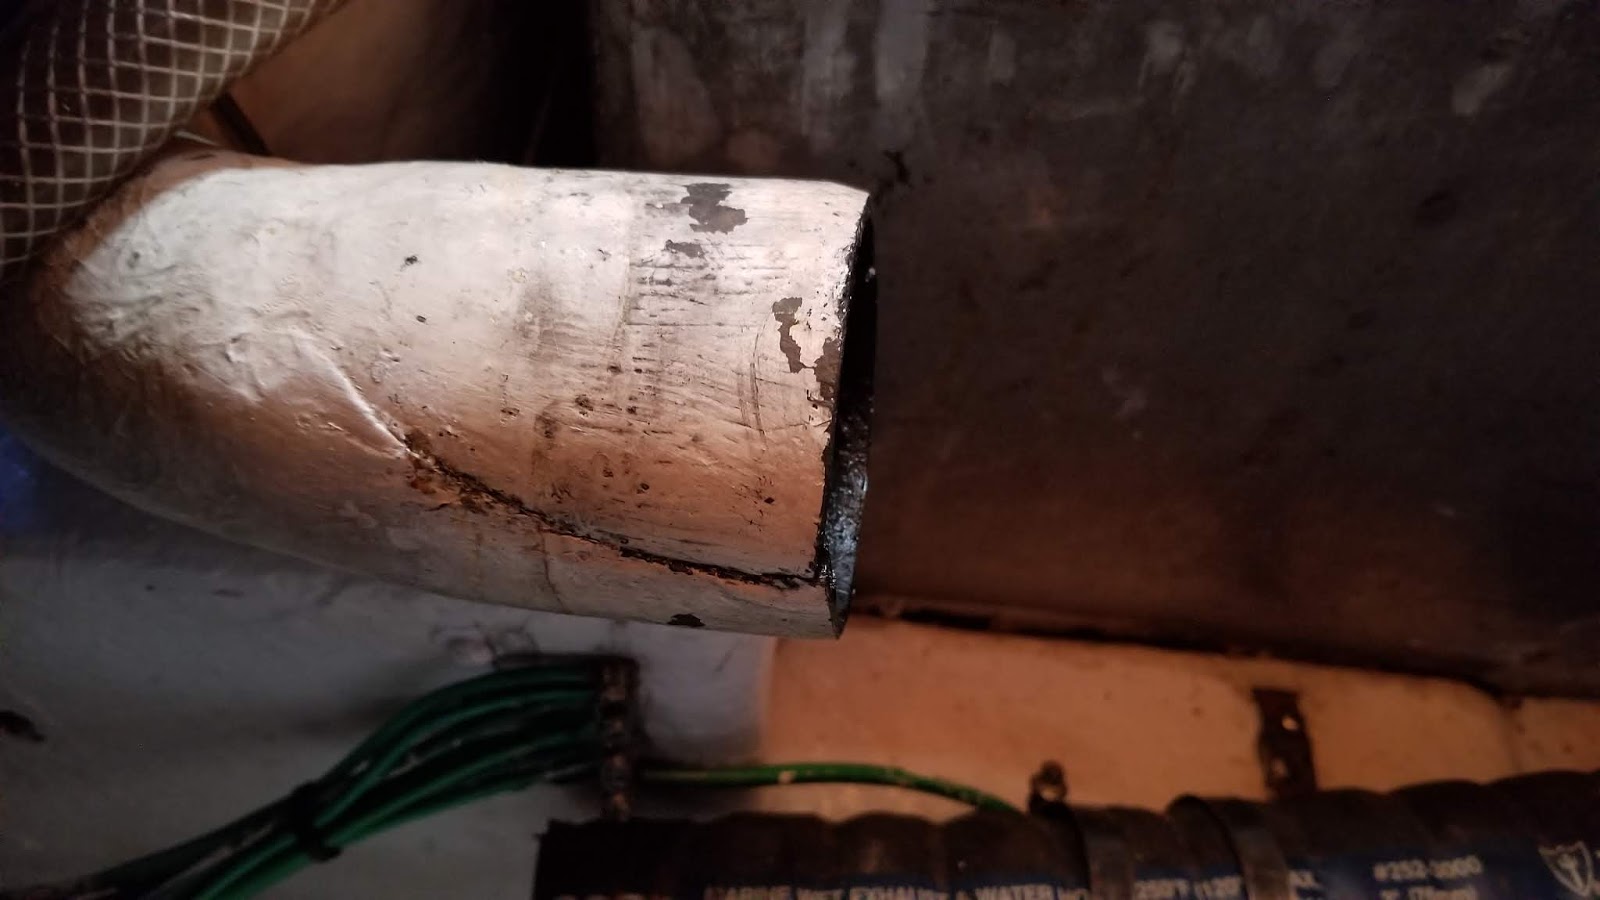
The muffler's fiberglass tube, that  connects to the exhaust hose, developed a crack.  Here's a picture of the tube.  


Clearly visible, thanks to the carbon in the exhaust, is the line of failure.  The line was along a seam in the fiberglass layup.  I suspect that's why the tube fractured the way it did.


The line of failure and the area around it was cutout with a 1/4" wide abrasive wheel.

Tape was temporarily put inside the tube along the length of the slot.  The slot was filled with West 404 thickened epoxy.  A layer of mat and cloth, wetted in West epoxy was wrapped around the entire circumference of the exhaust tube. 


After finishing the rough edges, the exhaust hose was reattached to the muffler.


An eight hour run, at 1800 rpm, confirmed that there are now no leaks.