Friday, December 13, 2013

Cameras, Whistles, and Bottom Jobs

masthead%20design.jpg
Starboard and forward view of mast top with cameras
Met with Jeff, who subcontracts to PL Jones, and planes hulls. He said the fiberglass strands on the Nellie's hull were a result of hydraulization—essentially water washing away some of the surface resin. He can plane the hull with a very shallow cut and that will remove the hydraulized glass and the remaining gelcoat. This will minimize the removal of good glass. Phil will then fill, fair, and apply seven coats of interlux 2000. Phil Jones looked at both the prop ding and the cutlass bearing. He thought a brass hammer could fix the prop in situ and that the wear on the cutlass didn't warrant replacing it.

 Removed the four inspection ports from the fuel tanks. Need to cut the existing 2" fuel fill nipple out and replace it with a 2" stainless deck plate. This will make the fuel ports easier to open and the tanks easier to fill. Removed the pencil zinc plug from the Cummins' heat exchanger.

Nellie uses a 1/2" diameter pencil zinc (these zincs have a 5/16" thread to hold the pencil into the plug). Problem is the brass plug accepts zincs with a 3/8" threads. Need to find/make a brass plug (which has 3/4" thread into the heat exchanger) and accepts our 1/2" with the 5/16" thread.

Designing the mount for the rear view camera. Here's a preliminary. Aft of the mast the camera interferes with the topping lift. So this drawing shows the cameras (yea, two cameras—the second being the forward looking IR) mounted outboard and swept aft of the mast. The 1/4" stainless mounting plate is shown above the 'forward view'.

 Designing the compressor system for Nellie's new Kahlenberg 117. Easiest solution is if a 120V, 1.5HP, 6 gallon, pancake compressor fits into the stack. Then only a 120V 12-2 would have to be run from the engine room. Fingers crossed.

Saturday, September 14, 2013

Headliner Dimensions and Finish

Nellie's salon headliner is made up of tongue-and-groove boards that are 1-13/16" wide and ?" thick. The wood used, Laban, is clear grained and light in color. Maple is a close grain substitute. Semigloss is the best match for the finish.  (Update: According to Tommy Chen the headliner's luster is a result of mixing semigloss and gloss finishes.)

Friday, September 13, 2013

Replacing Deck Bungs Lessons Learned

Replaced 77 missing deck bungs.  Several lessons learned: 60 grit on a random-orbital sander will best grind down the protruding dowel and remove the proud polysulfide caulking; sand the dowel before the epoxy dries so the wood dust will fill the gaps between the dowel and the hole.

Sunday, July 7, 2013

Exhaust Mount for Poor Man's Air Conditioning

Made a plexiglass insert for the starboard, forward salon window. The insert has a 4" hole in it to receive the LG air conditioner's exhaust hose. The insert fits into the window channel and is held in place by closing the window against it.

photo.JPG
Poor Man's Air Conditiong

Saturday, June 22, 2013

Prop Shaft Squeal

With my head in the lazarette I can hear a squeal from the prop shaft. It only happens at low RPMs. The cutlass bearing is at least seven years old. Need to give it a good going over when we haul.

 The shaft RPM was 717.7 (as measured with the optical tachometer) x 2.57 reduction = 1844 RPM. About what the helm's electronic tach reads.

 An IR thermometer on the header tank reads a 180F while the helm's engine temperature reads 190F—about 10F high. I still suspect a bad ground in the helm. Need to run a larger gauge wire.

Thursday, June 13, 2013

Oil Change

At 5512hrs changed the oil and oil filter. With 12 quarts in her the dipstick shows on the lower of the two marks.

Baby Gets New Window Screens

Outlook%2520-%2520dbhowell%2540hotmail.com%2520-%2520Google%2520Chrome%2520762013%2520111735%2520PM.jpg
Nellie's New Screens

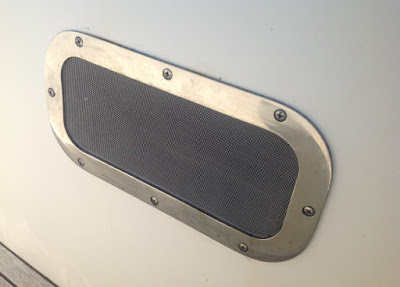
We weren't lucky enough to get factory window screens and it has been a struggle to come up with a good alternative. Particularly irksome are the little ports in the shower, head, and stateroom. An effective and inexpensive solution is to use the port's stainless ring to hold a screen in place (see picture).

The installation process is very straight forward. In fact, the hardest part of the job is removing the stainless ring. It is bedded in polysulfide but will yield with patience. I used a razor knife to cut the joint around the inside of the window. Then working around the inner circumference, with two screwdrivers and a putty knife, I gradually wedged the ring away from the cabin side. Two things to watch-out for, don't scratch the gel coat and don't bend the ring. With the ring off you'll note that the port itself is well bedded. If there are voids in the port's bedding, fix them now as I suggest the ring be reinstalled without bedding—it'll make replacing a damaged screen much easier. Use the ring as a template but cut the screen about 1/4" smaller. A thin layer of silicone caulk will secure the screen to the ring. After the caulk is dry reinstall the ring. As always, make sure to bed the screws.

I used $3 worth of aluminum screen, 18 x 16 mesh, for the four ports. At $60 a better choice might be stainless steel screening. Worth considering too is the size of the mesh. A 20 x 20 mesh will keep no-see-ums out.