Sunday, July 10, 2011

Paint, Hose and Bung

Reinstall the newly painted linear actuator bracket.

Cut the new exhaust hose to length and installed it on the wet muffler.

Put the last remaining bung into the deck.

Attempted to remove the ferrous arms off the rudder shaft. Unable to move the bolts so wet them down with a penetrating oil and will try again tomorrow.

IMG_1447.JPG

There's severe poultice corrosion occurring under this aluminum Raymarine linear actuator mount. This is happening because the wood, underneath the mount, is hygroscopic, i.e. absorbs moisture. The corrosion is easily eliminated by placing a non-hydroscopic substance between the aluminum and wood. I simply elevated the mount above the wood by using stainless washers.

IMG_1436.JPG

In the bilge looking aft. The bellows for the PSS can be see at the top of the photo. The prop shaft's intermediary support, with the green patina, is right behind it. There appears to be nothing wrong with the hose connecting the stern tube to the intermediary support. But, with the fuel tanks out it's an easier job to replace it. As evidenced by all the muck in this area of the bilge, it's very hard to get to.


Saturday, July 9, 2011

Getting the New 3" Exhaust Hose In

Nellie's new 3" wet exhaust hose is in! Removing the Webasto exhaust line, the wet exhaust's 3" through-hull fitting, the linear actuator and its wood support, then soaping the fiberglass inside the bulwark did the trick. However, using Trident Corrugated #252 hose, which bends fairly easily, was the answer. It's interesting that the 'loop' area, which is behind the stern's bulwark, has several spots which are too narrow for the exhaust host to fit. Naturally when the hose tries to enter such an area it merely jams. I used a 1' section of the old hose to probe the route for the new hose. Knowing where the 'shallow waters' were really helped. Removing the wet exhaust's through-hull helped in two ways: (1) gave me better physical access to the 'loop' area; and (2) with the new hose in place it's easy to put 5200 on the through-hull's hull mating surface, twist the through-hull onto the hose, and then manhandle the through-hull into its hole.

IMG_1444.JPG

Removing the wet exhaust thru-hull made it easier to get the thru-hull into the new hose. Only then was the thru-hull reinstalled into the hull.

IMG_1446.JPG

With the wet exhaust thru-hull out, hull thickness in this part of the transom measures about 7/16".

IMG_1449.JPG

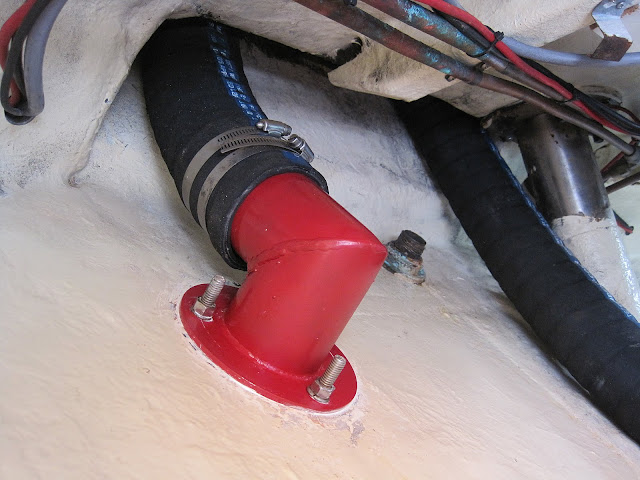
The new hose in place on the freshly painted thru-hull.


Thursday, July 7, 2011

Replacing Teak Deck Screws with Dowels

Finished the deck repair. In all 150 screws were replaced with dowels. One deck board under the port forward cabin window had warped upwards. It was successfully clamped flush to the deck and its failed screw replaced with a dowel.

Wednesday, July 6, 2011

Dowels vs Screws to Hold Deck Down

Repaired all the missing bungs on the stern and starboard side. The process is (1) remove the stainless screw (I use a power screwdriver but will revert to doing it by hand if the screw starts to strip out. Doing it this way only 2 out of 150 screws had to be slotted with a Dremel tool before removal); (2) drill out the screw hole its entire length (about 3/4") using a 1/4" twist bit; (3) using a toothpick coat the inside and bottom of the hole with epoxy; (4) roll the dowel in epoxy to cover its sides and bottom; (5) hammer in 1/4" x 3/4" dowel; and finally (6) Using a random orbital sander with 60 or 80 grit (it's best if the sand paper doesn't have the dust pickup holes as the dowels just love to get into the holes and rip the sand paper) sand the dowel flush with the deck before the epoxy dries so that the sawdust is mixed with the wet epoxy forced into any gaps.

Tuesday, July 5, 2011

New, 1/8" Thick, 5250 Aluminum Fuel Tanks -- $3,400

Got a $3400 fuel tank bid from Andy Bloodsworth, using 1/8" 5250, or $137 more per tank using 3/16" 5202. He estimated 6 '4x'10 sheets of aluminum at $200/sheet. Asked him to bid with A36 14 ga mild steel too.

Thursday, June 30, 2011

New 3" Trident #252 Exhaust Host

With good reason it seems I dreaded removing the wet exhaust hose. Resorting to a to grinder with a cutoff wheel isn't exactly an elegant solution. The replacement will have to be more flexible than the old hose. 23' of Trident Corrugated #252 seems to fit the bill.

IMG_1418.JPG
After leaving the through-hull the exhaust hose loops up into the bulwark before going forward to the wet muffler.

IMG_1419.JPG
After 24 years the hose has become very stiff. To try and extract it I pushed up on the hose's near side while pulling down on the rope attached to the far side.

IMG_1420.JPG
Looking up into the void. This shot was taken after the hose refused to move any farther. The fiberglass is narrower in the center section and the hose is pinched in place.

IMG_1423.JPG
After the hose jammed at the top of the loop, a grinder made the 'extraction' easier albeit messier.

Wednesday, June 29, 2011

LNVT Fuel Tanks

Got a $3,550 quote from Luther's, Bristol, RI, for the four tanks made of 1/8" 5052 aluminum. Bud Luther, who built Sally W's tanks, redesigned them to be easier to make and also reduced each tank's height by 1/2". Some of this 1/2" space will be used by plastic strips attached to the bottom of the tanks; the idea being to keep the aluminum away from any water.

 The LNVTs original mild steel tanks are 14ga or .0747" thick. Aluminum weighs 1/3 as much as steel. So, tanks made from 1/8" aluminum weigh 44% less than those made of 14ga mild steel. Similarly, a tank made of 3/16" aluminum would weigh 16% less than if made from 14ga mild steel. 3/16" aluminum is about four times the price of 14 ga mild steel.

IMG_1411.JPG
A tooth pick marks the hole. At the point of failure corrosion is evident both inside and outside the tank.


IMG_1409.JPG
The location of the leak became obvious after pressurizing the aft port tank to 3 psi.