Monday, July 28, 2014

Finally--the splash photo!


It's been a long road but Nellie went feet wet yesterday.  She passed her leak check--but not without incident.  Spilling water rudely reminded me that I still needed to install the heat exchanger zinc.  We ran her through her paces in the river without incident before returning to the yard's dock.  The winds are contrary and blowing up to 20kts.  Not an ideal day for the four hour sea trial home.

Antifouling paint job summary: We went through four gallons of Pettit Ultima SR60 bottom paint.  We used 1/4" nap paint rollers and where necessary, paint brushes, to apply the paint.  This gave us two coats all around and four,1' wide coats, on the waterline.  There was no paint to spare. 


Wednesday, July 23, 2014

Anti Fouling Green

It took two gallons of Pettit's Ultra SR60 to put one coat on the bottom, running gear and bow thruster, and two coats on the waterline. We even have a little left to put under the jack stands.

The 1/4 nap roller covers worked well. Once mixed the paint stayed mixed--they always warn about the copper falling to the bottom.

Weather permitting, tomorrow we'll get the last two gallons of paint on.

Tuesday, July 15, 2014

Bootstripe Day Two

After sanding with 320 grit we got the second coat on.
So much for a pint being able to do the bootstripe. The pint got us 1-1/2 times around. Looks like she'll need three and maybe four coats.

Monday, July 14, 2014

Bootstripe Beginngs

Started painting the 2-3/4" tall bootstripe today using Interlux white polyurethane. Interlux recommends sanding between coats with 220 grit. We used small foam rollers to apply the paint and then tipped it out with a paint brush. It's going to take at least three coats.

Saturday, July 12, 2014

Coat Five: It's a Wrap!

Yea, I know, the fifth coat was supposed to be white. Here's the story--it took 1-1/2 gallons to finish up today; one gallon of white and half a gallon of grey. Who said Interlux 2000E only comes in white and grey? It comes in light grey too ;-)

So here's what we learned after applying five coats of Interlux 2000E:

Walmart's 1/4" nap rollers work great
Mix only enough 2000E to do 1/2 the hull (about 1 gallon)
Lightly Sand the hull between coats
Alternate the color of each coat
Used new pans ($1 each at Dollar Tree), roller covers ($6 for 2 at Walmart) and brushes ($1 each at Dollar Tree) with each new load of 2000E
Put new tape along the waterline after each coat
Sand the the ridge smooth at the waterline after each coat.

Friday, July 11, 2014

Coat four: Grey Day

An hour of sanding finished up the fairing job. We only used 1-1/2 gallons of Interlux 2000E today. The first three coats took 2 gallons each. Got a forth coat on the prop and the first coat on the bow thruster.

Removed the Vetus 95's zinc.  That's something I wouldn't want to do in the water: two Phillips screws release the prop; push the prop's drive pin out of the shaft; then two Allen wrench screws release the zinc.  That's a lot of little pieces to lose.  The Zinc isn't too bad but does need to be replaced.

One layer of Interlux 2000E mic's out at 0.001" (I measured a layer which peeled off the plastic paint roller pan).

Wednesday, July 9, 2014

Pink Mostly Off

How hard can it be to remove Awlgrip's two-part filler? As it turns out, really hard. We spent 3-1/2 hours sanding away with 5" random orbital sanders using 80 grit and only got 3/4 of the hull done. John Niccolls, Knock Off #66, pointed out that the reason flat paint is so popular is that it doesn't show the voids in the underlying structure. The Interlux 2000E barrier coat is very shiny. Thus the more we put on, the more obvious the voids became. The good news is that ablative bottom paints aren't shiny! I've got to remember the mantra--better us the enemy of good enough.

The yard is moving Nellie to a new location so I asked them to reposition the stands and blocking. We'll be able to get the whole bottom barrier coated now. Cool.

Monday, July 7, 2014

Sanding and Pink On


I'm pleased the way we're able to feather multiple layers of Interlux 2000E together just below the top of the bootstripe.  We've been careful not to touch (i.e. scratch) the green Awlcraft above the bootstripe.  The successful feathering means the surface of the shiny, white bootstripe should look nice and smooth.


While we thought we'd be applying the forth layer of Interlux 2000E today, we didn't.  We were both seeing a lot of sanding divots and thought it best to fill them.  Thus it was another day of 'pink on'.

Thursday, July 3, 2014

Coat Three: White Again

Despite hurricane Andrew coming up the coast we get the third coat on today. It took about 3-1/2 hours.

While sanding isn't required between coats, the hard, little nubs of detritus require it.

We went through another two gallons today. Looks like the whole job will take 10 gallons; plus some to put on the areas the stands are currently covering. We changed out roller pans, roller covers and paint brushes between each gallon. On the last coat we didn't have to do this. I'm sure it's today's higher temperature that is making the difference.

Slowly working each barrier coat layer up towards the top of the bootstripe is working well. I was concerned about ridges in the boot stripe but sanding after each coat is smoothing things out.

Tuesday, July 1, 2014

Coat Two: A Battleship Grey Day

Today we began by sanding down the ridge of 2000E left behind when the bootstripe masking tape was removed. As the picture above shows, the 2000E ends just beneath the upper side of the bootstripe. Thus it's important that the transition between the 2000E and bootstripe be as smooth as possible.

To my surprise we used two gallons of 2000E today. While we could have gotten away with 1-3/4 gallons it was nice to have extra to go back and thoroughly cover voids and pinholes.

I'm disappointed in my fairing job. The shiny 2000E makes every void obvious. A long board rather than a random orbital sander should have been used.

Saturday, June 28, 2014

Coat one: Interlux 2000E

After each barrier coat the bootstripe tape comes off an the ridge is sanded
Pencil marks from the factory in the glass.
17288 stamped number in the prop
It took two gallons of Interlux 2000E to cover the bottom, rudder and prop. The first coat is supposed to use more than subsequent coats. My guess is that the next coat will take 1-1/2 gallons. The 1/4" length nap roller-covers work great. A paint brush is miserable to use--the material goes on too thick.. Pinhole voids are a real problem. A bunch of time was spent eliminating them. We put a good paint masking tape along the top of the of the old bootstripe. Another layer of tape, that'll be removed after each coat of 2000E, will extend downward from the bootstripe tape. The ridge left from the 2000E/tape interface will be sanded off before the next layer of 2000E is applied.

Tuesday, June 24, 2014

The Last Sand

Today we sanded off 90% of the fairing material that was applied yesterday. A 5" random orbital sander with 80 grit paper doesn't have enough power to cut through the filler quickly. Whereas an angle grinder with the same paper rips through the job. After the sanding was done we washed the boat (yet again).

As the photo attests, our trunk contains all the tools necessary for a DIY bottom job.

Sunday, June 22, 2014

Fairing On Again

Lots of fairing on the starboard bow
The second fairing coat went on today. Fairing seems to beget fairing as the filled areas make surrounding voids more visible. Gotta remember the mantra, better is the enemy of good enough.

Friday, June 20, 2014

What, Sanding Again?

Not sure why but we both thought sanding the Interlux filler would be easier. Actually it did come off easily enough, it was just that there was so much of it. Being up-close and personal also helped us spot more areas requiring fill. We used a 5" random orbital with 80 grit and a 7" angle grinder with 60 grit. Hands down the better tool was the angle grinder. Dust covered Nellie yet again, so the last job was to wash her with soap and water.

The idea now is to make each coat of Interlux 2000E 1/2" higher up the waterline than the previous coat. The last coat will be about 1/2" below the top of the bootstripe.

Thursday, June 19, 2014

Fairing

The Interlux two-part fairing goes on very nicely.  It was ~85F today and so the epoxy fairing was firing quickly.  Lost some of the first batch but never had a problem after that.

The fairing is used to smooth any gouges. 


Paying special attention along the water line 

Tuesday, June 17, 2014

Sand and Wash--Part II

After one more lap checking for blisters the hull and bulwark were washed with soap and water.  Tomorrow before beginning to fill we'll wash the areas again with acetone.

A few of the holes I'd drilled in the shoe were overflowing with water.  After drying the holes out as best as possible with a paper towel, heat, via a heat gun, was they applied.  The holes were then filled to the top with epoxy.

The holes after being dried, heated and then filled with epoxy
Learned from Phil to use a 1/4" nap roller to apply the Interlux 2000E as a thicker nap may leave ridges.  The first coat of 2000E will use a lot more material than subsequent coats.  The guesstimate was 2 gallons versus 1-1/4 for coats 2, 3, 4, and 5. Yea, five coats in all.  Can put on two coats per day--about 8 hours between coats.  The first coat will be white, then gray, then white...  I'm thinking about running the 2000E right to the top of the bootstripe.


Feels good to be done for the day

Monday, June 16, 2014

Sand and Wash--Part I

Washed the house, inner bulwark, and decks with soap and water.

As the fiberglass dries the remaining blisters become very apparent.   Found about 10 that needed to be ground out.

The blisters wet interior looks dark against the fiberglass

The blister area after grinding
The shoe was leaking rusty water from about five places.  Per Tommy Chen's instructions, a 1/4" hole was drilled about 1/2" deep in the area where the water was manifesting itself.

Tapping the source of the shoe's rusty water


Saturday, June 14, 2014

One more day...

Getting the bottom paint off from around the thruhulls was laborious and required a Dremel Tool with a small sanding drum.

Tomorrow we'll wash the hull with soap and water then wipe her down again with acetone.

Tuesday, June 10, 2014

The Gel Coat is Off


South winds have been rare as hens teeth this spring. They were blowing this morning so we got some time on Nellie. Phil had moved the stands and blocks giving us access to the only unfinished areas. After today's work there's just a little bit left around the through hulls to finish.

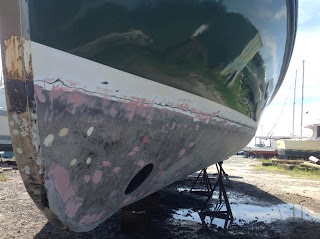
Among other things the picture shows the boot stripe and the black bottom paint below it. While the hull was being laid up it's pretty clear that the gel coat was applied at several different times because the barrier coat is below the gel coat in the lower part of this photo, and on top of the gel coat in the middle of the photo. Perhaps the white, below-the-waterline gel coat was put on first--but only to just above the waterline.  Then the barrier coat was applied over the gel coat and stopped just a little farther up the hull than where the gel coat stopped.  Finally, gel coat was sprayed the rest of the way up the bulwark.  The straight line of gel coat in the picture shows that they taped off the lower part of the hull before spraying gel coat on the bulwark.


Monday, May 26, 2014

Complete Rough Sanding ... Check!

Another 1:20 hours today and all, we'll almost all, the gel coat is off. Asked Phil to move the stands and blocking so we can get the surfaces under them too. Still need to clean up around thruhulls too.

Dark and oozing blisters are very easy to spot on the sanded fiberglass hull. It's a simple matter to dig out the blister with the 24 grit paper we're using to sand the bottom.

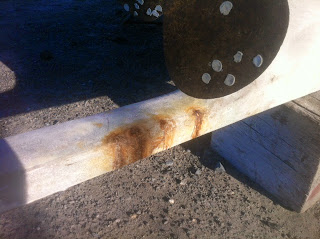
As evidenced by the pictures below it seems seawater is penetrating voids in the shoe and working its way to the iorn ballast.
About a week after sanding the show, rust colored water stains it.

An hour after sanding the stain off, drops of clear water appear.

Thursday, May 22, 2014

Grinding, grinding, grinding...

Another two hours grinding on the bottom.  Looks like just one more day grinding and we'll be on to the 'fill and fair' stage.

Bicki Feeling her oats ;-)

Monday, May 12, 2014

Starboard Side Completely Sanded? Check!

There's some progress to report.  After 2:20 grinding on the hull today we finished the rough sanding on the starboard side.  Yahoo!  

Clean starboard side bottom!


It feels good to make progress.
With the end of grinding in sight it's time to start nailing down the products and processes we'll use to barrier coat the bottom  Here's a page doing just that...

A sample piece of the gel coat off the bottom mic's in at .027"

Sunday, May 11, 2014

The Grind Continues


Hours on end of grinding gives one plenty of time to consider the layers, one, by one, by one as the angle grinder slowly cuts through them.  The picture below shows: black bottom paint; red bottom paint; white gel coat; the gray is an epoxy barrier coat put on at the yard; and finally the raw fiberglass which is tan.  If all the bottom was as well stuck together as the layers in this picture, grinding would be unnecessary. But...


...as the picture below vividly shows, all the layers aren't sticking together.  In fact, in this picture there's a noticeable gap between the fiberglass and the layers above it.   Interestingly, it isn't the gel coat that's peeling, it's the epoxy barrier coat beneath it!  Perhaps during hull layup the yard let the epoxy set too long before applying the glass over the barrier coat.  Whatever was done wrong, it wasn't totally wrong--because at least half the gel coat is well bonded.


No explanation needed for the picture below, except to say this was taken after only 1:20 of grinding.


Saturday, May 10, 2014

Another Day on the Bottom

Some people go to gyms...

We lasted 1:40 grinding on the bottom today.  For the first time we covered ourselves in corn starch, the idea being that it fills the pours so the fiberglass can't.  It really does work.

Corn startch to the resuce!

We're both less itchy after showering.  The 16 grit paper cut right through the bottom paint, gel coat and barrier coat, but it's so coarse it misses as much as it takes off.

We've both gotten good at recognizing blisters in the fiberglass: they're usually a little darker than the surrounding glass; the fibers in the glass are more pronounced--as though the resin had been washed away; and some ooze liquid after being disturbed.  The fix is simple enough, run the edge of the sand paper across the entire blister until the glass is the same color and consistency as the surrounding glass.  None of the blisters have been over 1/8" deep and most are 1/16" or less.  At least 2/3 of the starboard side and 1/2 of the port side is now done.

Wednesday, April 9, 2014

The Bottom Job Begins

Decided against planing the bottom. I didn't like the idea of pulling good glass off just to remove the gel coat. So, today Bicki and I started grinding the gel coat off. It's a dirty, tiring job. The best tool we've got is persistence. The second best tool is a 7", fiber-backed, 36 grit sanding disk mounted to an 11,000 rpm 4-1/2" angle grinder. Getting through the old bottom paint is almost as bad as removing the gel coat. It's time to switch to ablative paint. Phil Jones (P.L. Jones Boatyard, Hooper Island, MD) recommended an epoxy primer followed by an epoxy filler for the areas where the gel coat has peeled into the bootstripe. Phil also said to leave scratches in the bottom's fiberglass, it'll help the Interlux 2000 grab. Here's some good news, I haven't found a single blister.

The prop had some dings on the end of the blades. Used a 6lb hammer as a bucking bar and with a 2lb hammer hit the prop. They did an amazingly good job. I can't tell at all where the damage was.