Sunday, November 26, 2017
Revisited: Cummins Water Temperature Sending Unit
Sunday, July 9, 2017
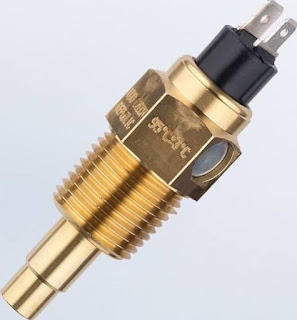
VDO Sending Units
Nellie's water temperature gauge has recently started reading 210°F when the IR temperature gun is reading 180°F. To say this is disconcerting is an understatement. Here's my temporary solution.
Yep, just cover the darn thing with a piece of paper.
Another anomaly has to do with the oil pressure gauge, it's reading about 5 psi low and the needle is quaking.
The Cummins 4BT-3.9M came equipped with VDO instruments. Among Nellie's spares is a VDO water temperature gauge. I suspect it's there because a former owner bought it while diagnosing a sender unit/gauge problem. The sending unit was at fault so the gauge became a spare.
I've ordered new water temperature and oil pressure sending units in the hope that they'll fix Nellie's problems.
P/N 360-009 VDO Oil Pressure Sending Unit
P/N 323-478 VDO Water Temperature Sending Unit
Friday, June 9, 2017
New Thruhulls and Seacocks
Last year the seacock that supplies Nellie's foredeck washdown and galley hand pump got very hard to move. This year two Lord Nelsons reported seacock failures. It was time to take a good look at Nellie's.
Nellie has five underwater seacocks:
1) 1-1/4" main engine raw water
2) 3/4" generator raw water
3) 3/4" supply for both the foredeck washdown and galley hand pump
4) 1-1/4" toilet pumpout
5) 1-1/4" galley sink drain
The seacocks were bedded? in a black polysulfide caulk. The same caulk that OEY used extensively. The caulk was still pliable, waterproof and, best of all, didn't greatly resist part removal.
I found the OEY original Cheng Wei seacocks to be perfectly serviceable. There was some mineral buildup but that was removed in a phosphoric acid bath. Still, the seacocks were 30 years old. It was time for them to go.
We installed Groco FBV Bronze Full-Flow Tri-Flange Seacocks.
These have the advantage of being through-bolted to the hull. The thruhulls were also replaced.
The thruhulls had to be cut to length. For adequate strength, each thruhull should be screwed into its seacock so that at least four full threads are in contact.
Since there's about 1-1/4" of thread on the inside of the seacock, the thruhulls were cut 3/4" longer than the hull's thickness. This easily exceeds the four thread minimum.
The supplied thruhull nut was used to guide the blade.
5/16 x 2" stainless steel, Phillips, flat head, machine screws, lock washers and nuts were used on each seacock. The screw heads were countersunk into the fiberglass. The screws were cut so that not a lot of extra length protruded into the tug.
All the parts were bedded in white BoatLife (polysulfide). It took about 1/2 of a cartridge to do the five thruhulls and seacocks.
Replacing the seacocks and thruhulls isn't an easy job, the first time anyway, but it's definitely one worth doing. There are at least two distinct safety benefits of doing this job. First, through-bolted seacocks are much less likely to have a failure which sinks the boat. Second, I now well know where all the underwater seacocks are located.
Thursday, June 8, 2017
Nellie is Feet Wet
Wednesday, June 7, 2017
Bootstripe and Bottom Paint
Wednesday, May 17, 2017
Wire...
Found and fixed a broken wire on the port speaker wire.
Ran a bonding wire to the genset's seacock.
Found a crack in the genset's Groco ARG-750-P strainer bowl. Ordered a replacement ARG-753 (through Walmart).
Removed the four wall sconces in the saloon. We're going to paint them gold. Fingers crossed that works. If so the new 12V COB LEDs will go in them.
Thursday, May 11, 2017
Clean and Lube the Washdown Seacock
Several owners have reported metal failures on their seacock handle shafts. Could this explain Nellie's problem?
Removing the seacock was easy. A pipe wrench and very little torque did the job. I was surprised to see that there wasn't any caulk between the seacock and hull. Nor did there appear to be any sealant on the threads mating the seacock to the thruhull. However, since the valve didn't leak, the lack of caulk and sealant clearly wasn't an issue.
After removing the top of the seacock it was obvious why flow through it had been restricted.
Mussels, one fairly big, had taken up lodging. The valve was submerged in phosphoric acid for an hour to clean it. Working the ball and applying some Vaseline eased the stiffness, but the ball still only moved about 95% of its full travel. Tomorrow I'll remove the stem packing and see if that improves things.


